Introduction
This article will help you in configuring the synchronization of users, contacts and Salesforce Custom Objects from Salesforce to Docebo. The data master for users, contacts and Custom Objects is Salesforce. This data is always synchronized from Salesforce to Docebo, not the other way round.
When users are synchronized, the users defined in Salesforce will also be available in Docebo, meaning that they will be able to log in and start their learning experience after courses and enrollment data is also synchronized. This means that when using Docebo embedded in Salesforce, users will not need to log in Docebo, having a learning system completely available within their Salesforce org.
Prior to running the synchronization process, it is very important that you are aware of any notifications that may be triggered in the platform by the import process. You may need to either create, edit or unpublish notifications prior to performing the synchronization, depending on your desired outcome. Please note that this applies to platform notifications, but doesn't refer to Salesforce plugin notifications. Learn more about Salesforce plugin notifications.
The Salesforce integration operates on a one-to-one relationship with Docebo platforms. If you do not have a Docebo sandbox environment for testing, you will need to test in production with your Salesforce sandbox environment. Once you are ready to proceed with integrating the Salesforce production instance, you will need to delete the installed application and start over. The same applies if you have a Docebo sandbox environment but do not have a Salesforce sandbox environment. When testing is complete in the Docebo sandbox, you will have to delete the installed application from Salesforce and reconfigure the installation from the beginning.
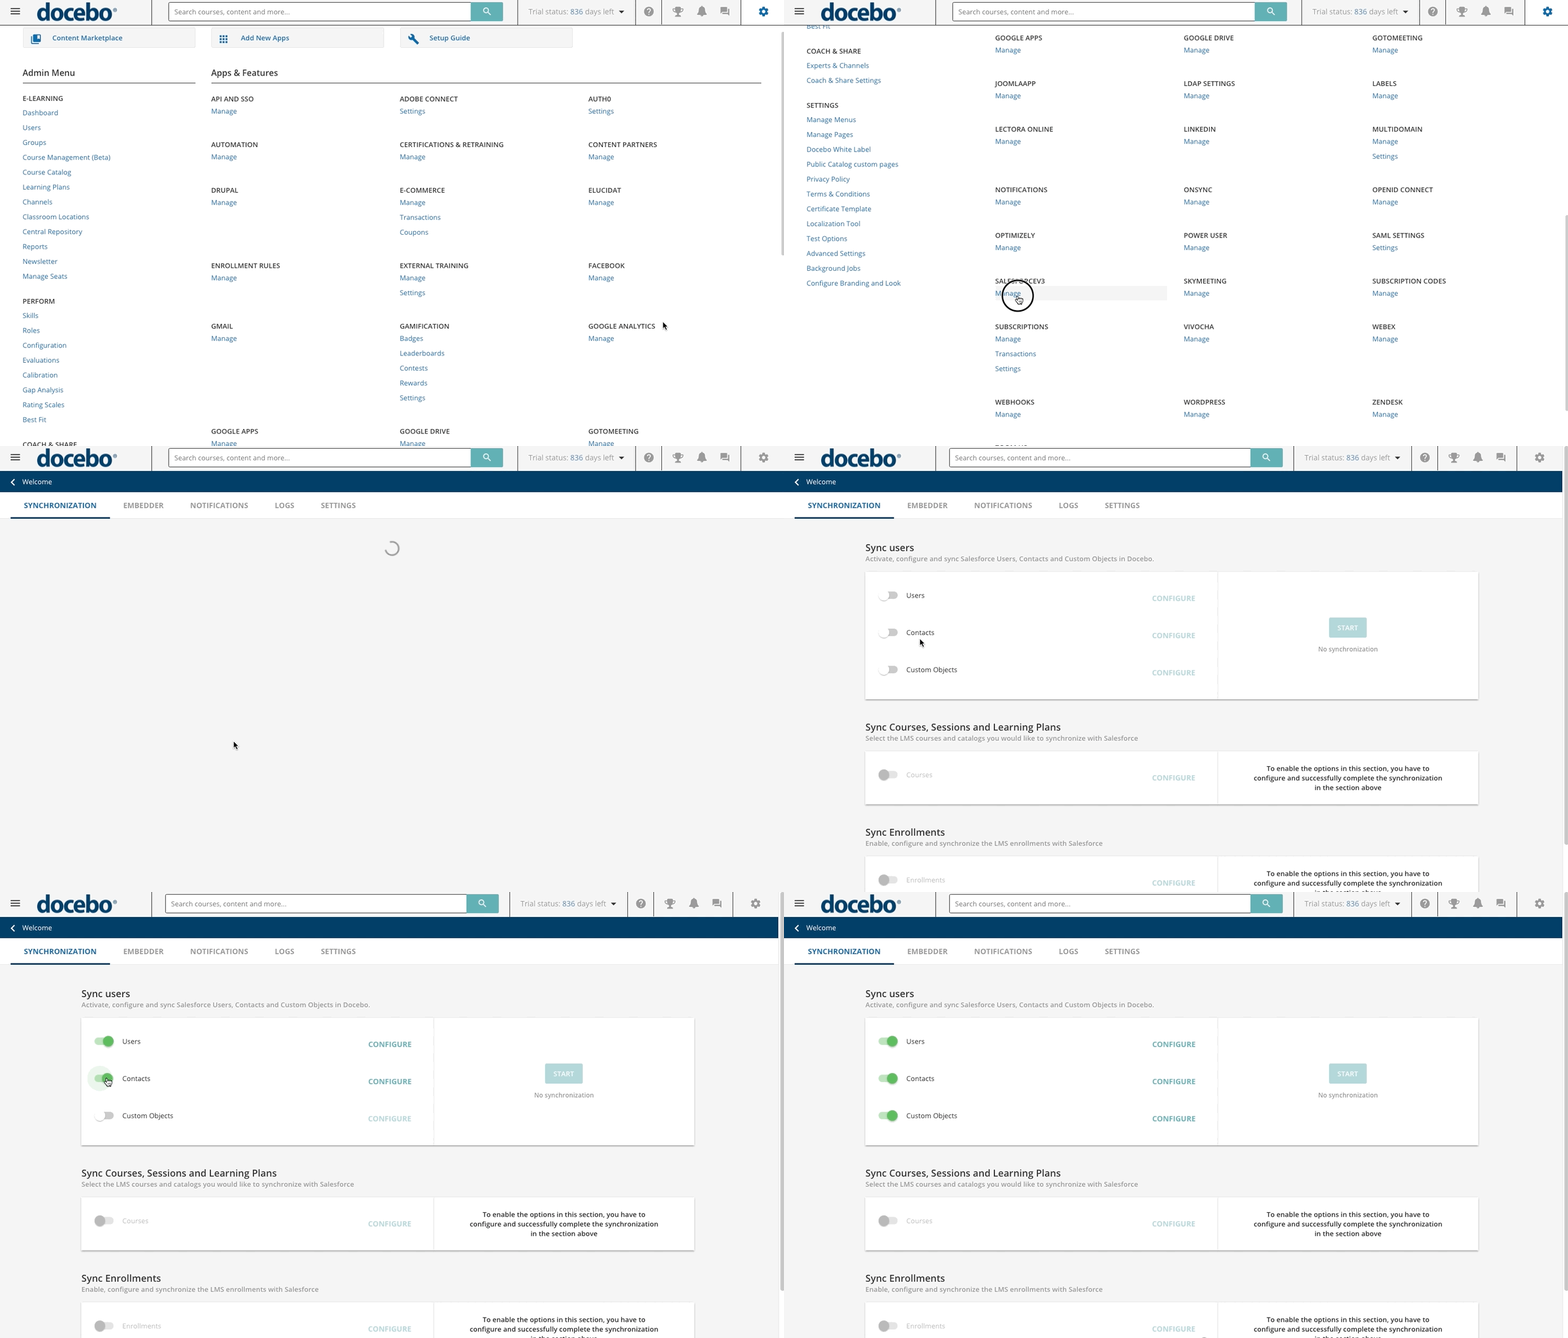
You can configure and run the synchronization process, after installing the Salesforce package, both from Salesforce and from the Docebo. In Docebo, reach the Admin Menu from the gear icon, find the Salesforce section, and press Manage. Move to the Synchronization tab.
 The Sync Users section of this tab is used to configure the synchronization of users, contacts and custom objects.
Configuring User Synchronization from Salesforce to Docebo
Merging Salesforce contacts with existing Docebo user records as well as merging Docebo user records with existing Salesforce contacts or users is not supported.
The Synchronize Users section of the Synchronization tab is used to configure the user synchronization from Salesforce to Docebo. Begin by selecting the data you would like to synchronize from Salesforce to Docebo:
- Users. Enable this option to provision Salesforce users in Docebo.
- Contacts. Enable this option to provision the contacts available in your Salesforce Org.
- Custom Objects. Enable this option to map data in the custom objects as Docebo as users. You can select and import one custom object at a time.
When configuring the user synchronization, please remember that the integration between Docebo and Salesforce does not manage Salesforce Accounts with special characters in the name attribute.

Click on Configure to proceed.
Configuring the Data Import
Independently from the selected user synchronization type, you will be required to map user fields before running the synchronization. User fields’ mapping is required for all the types of data that you wish to import into the platform.
General Settings
In the General Settings tab, select the List View from the dropdown list. All of the available list views are imported from Salesforce. Please note that it is not possible to import custom objects with no List View, as they will not be listed in the dropdown menu.
After selecting a List View, move to the Standard Fields area and match the listed fields with the names of the fields of your Salesforce user fields by selecting them in the drop-downs. Please note that username, email, first name and last name are mandatory fields for the synchronization and MUST be mapped or you will not be allowed to proceed. In order to map the non-mandatory fields, move to the Additional Fields tab.

Move now to the Options tab to configure the import according to the following options:
- Change Password. When this option is activated, users will be asked to change their password immediately after their first login to the platform.
- SFDC User Provisioning. Enable this option to allow the automatic provisioning of Salesforce users to the embedded version of Docebo. This option is always visible when synchronizing users, it is not available for Contacts and Custom Objects. When selecting this option, remember that the Salesforce username must match the Docebo username, and the field must be mapped accordingly in the data mapper.
- Update User Information. When this option is flagged, imported data for users already existing in the Docebo platform will overwrite data that is different from the existing ones.
- Incremental Synchronization. Use this option to set the synchronization process to synchronize only data updated or modified since the last synchronization. When this option is not selected, the synchronization process will synchronize all users' data. Please note that the incremental synchronization also monitors the updates to the Salesforce Account that Contacts belong to.
- SAML / OpenID Connect /Auth0 User Provisioning.Use these options to activate the user provisioning from the corresponding systems. The option available for user provisioning depend on the providers installed in your platform (even if not configured). Please note, the Just-In-Time Provisioning is available for these providers only.Further information on how to configure the user provisioning.
Click on Save Changes to confirm your configuration.
Organization Chart
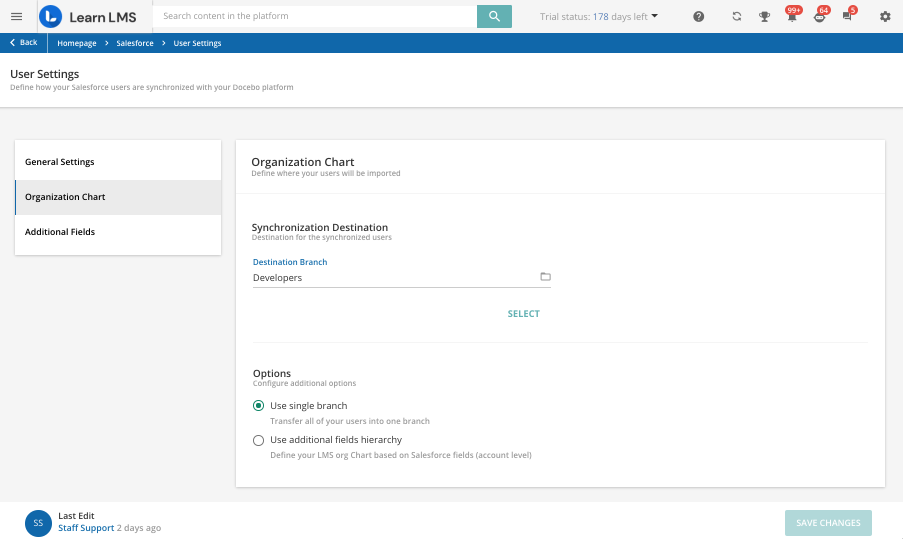
Now move to the Organization Chart tab to configure how users will be assigned to branches, once imported in Docebo.
First, select a Destination Branch so that users not belonging to any branch will be assigned to this default destination branch.
Please note: The Destination Branch must be associated with a Branch Code. It is not possible to select the Docebo root branch as Destination Branch. Also, remember that, if your platform uses a branch structure with the same structure as the one used in Salesforce (same branch names), an already existing branch must have a Branch Code associated for proper synchronization. If a user, contact or custom object are imported and the branch code does not match with any of the sub-branches of the default branch folder selected in the Salesforce configuration, the user/contact/custom object will be placed in the default branch folder selected in the Salesforce configuration.
In the Options section, select Use Single Branch to assign all the imported users to a unique branch, set in the Destination Branch section.
Select the Use additional fields hierarchy option to organize users according to the Salesforce picklists options. When this option is used, every option of the selected picklist, up to the third level, will be converted into a Docebo branch. Select the parent branch for your imported picklist in the Destination Branch section of the left panel. Branches will be automatically created under the Destination Branch during the data import process: they will be named after the picklist option name. Please remember that picklist options are not automatically maintained in Docebo. This means that if a picklist option is deleted in Salesforce, the corresponding branch is not automatically deleted in Docebo and you will have to delete it manually.

When selecting to synchronize Contacts, you can also take advantage of the SF account based branches option. When this option is selected, the import process will create a branch for every imported Salesforce Account. Select the parent branch for your contacts in the Destination Branch. Branches will be created under the Destination Branch according to the Salesforce Account Hierarchy structure and will be named after the imported Salesforce accounts. Contacts will be imported in the branch named after the Salesforce account they are assigned to. The Salesforce integration with Docebo does not support Person Accounts. This option is not available for the synchronization of Users and Custom Objects.
Click on Save Changes to confirm your configuration.
Additional Fields
Move to the Additional Fields tab to map the non-mandatory user fields. Click on + Add New and select the Docebo field you wish to map from the right panel. Click Confirm. The field will be listed in the tab, in the Docebo LMS column. Map the corresponding Salesforce user field in the Salesforce Filed column, selecting it from the dropdown.

Click on Save Changes to confirm your configuration.
Running and Scheduling the Synchronization
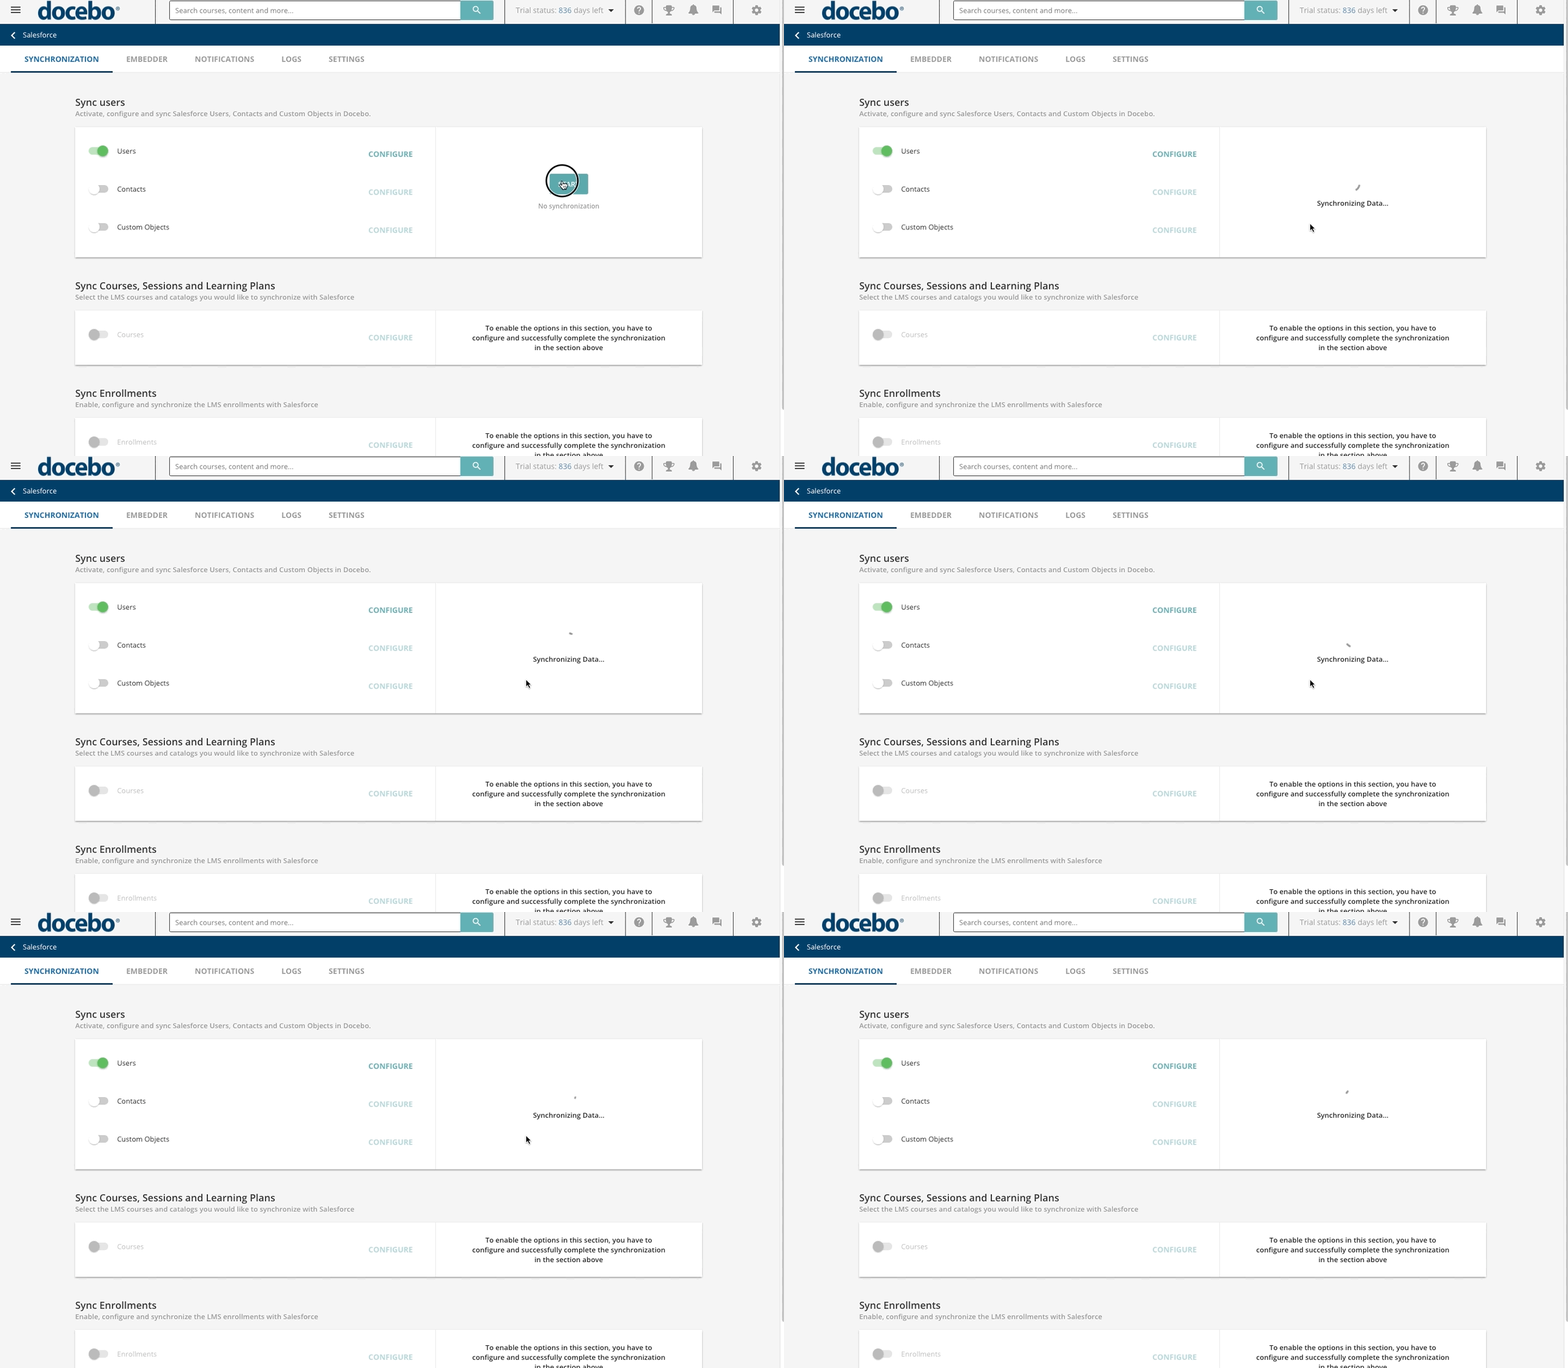
From the Synchronization tab of the Salesforce configuration page, press Start in the Sync User area to launch the synchronization process. A background job will be started for every entity you are importing (a background job for users, one for contacts and one for custom objects).
 You can stop the synchronization it at any time while it is running. Click the ellipsis button in the Sync Users box and select Stop Synchronization. In order to re-launch the synchronization, click the ellipsis button again, and choose Resynchronization. The synchronization will restart from scratch, not from where you left off.
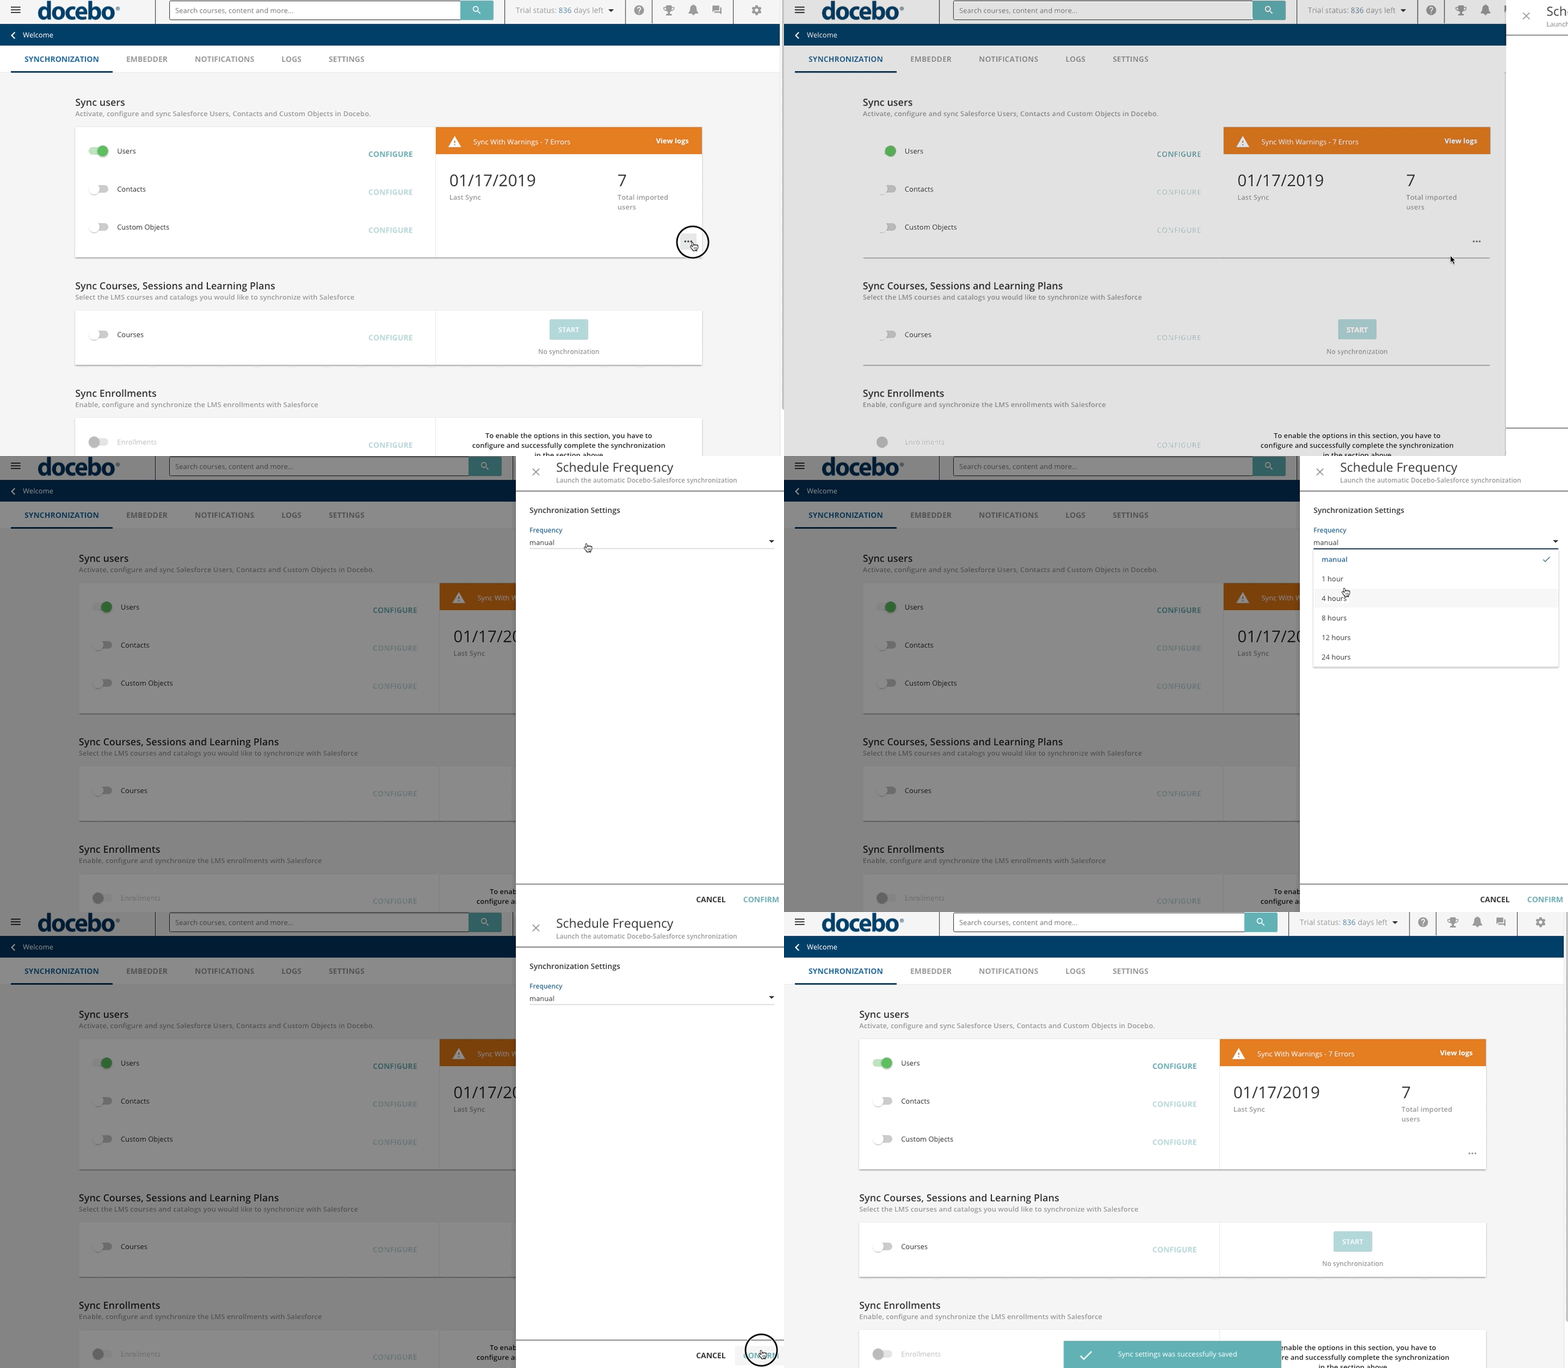
Once the synchronization is over, the timestamp of the last synchronization, together with the number of imported users will be displayed on the right side of the Sync User area.
 If the synchronization process fails or ends with errors, click on the View Logs button to move to the Logs section of the Salesforce configuration page to check synchronization logs, which will open on the event generating the synchronization error or the failure. Further information on synchronization logs.
You can set the synchronization to be run on a regular basis. To do so, click on the ellipsis button under the number of imported users, and select Schedule.
 In the right panel, define how often the synchronization will be run. Select one of the available options, or leave it as Manual to manually start the synchronization whenever you need it.
After the first synchronization, the Start button will no longer be available. In order to run the synchronization again, click on the ellipsis button under the number of imported users, and select Resynchronize to manually start the synchronization process at any time.
Tips & Tricks
Data Import Configuration
Once importing the users from Salesforce to Docebo, if the password field is part of the import user configuration, the sync will overwrite the password entered by the user at first login, if any, with the password mapped from Salesforce. This can cause inconvenience, so we suggest importing the user without a password. In the creation notification the user will receive, a link to set the password for the first time is included, making it unnecessary to use the force change option. If no notification is sent, the user could log in using the Forgot Password link, which might be renamed to Reset Password or something similar.
Internal Server Error
There may be several reasons why your Docebo application generates an internal error while configuring the user synchronization. First, make sure you follow the installation procedure as described in the Knowledge Base. If you have properly configured your integration then here follow some other reasons leading to that error:
- Check if the Sandbox Mode option is selected in the Settings tab. The sandbox mode should be selected only if your Salesforce account is in trial mode, so uncheck this flag if your Salesforce account is either Pro or Dev.
- Make sure you set the Permitted Users option value to Admin approved users are pre-authorized during the installation process, then move to the Profile related list and define the users' profiles that will be able to access the platform.
- Make sure you set the proper URL for your Salesforce org in the Settings tab. In order to retrieve the URL of your Salesforce org, connect to your Salesforce developer account, click on the Setup icon in the top right corner, move to the Settings section of the left side menu, select Company Settings, and finally the My Domain option.
- Make sure that the Superadmin user running the activation in Docebo is also present as an Admin user in the Salesforce user database: usernames MUST be the same in both systems.
Disclaimer
This article describes the synchronization process and how to use the integration in detail. Please note, however, that the integration covers a large number of scenarios and it is not possible to list all of them here. If this documentation does not provide enough information for your specific case, please contact us via the Help Center.