The integration with Adobe Connect V1 is no longer supported since November 30, 2020, and reached its end of life on February 28, 2021.
Introduction
For those using Adobe Connect Meetings and Adobe Connect Seminar for web training and remote collaboration, your learning platform can integrate with this video conferencing software, so your users can access live training and collaboration sessions directly from their Docebo platforms.
More information about webinar tools for ILT and VILT courses on mobile devices
Please be aware that the integration is available for Adobe Connect SaaS. It does not support on-premise deployments or Adobe Connect Managed Services.
Activating Adobe Connect in Your Platform
Activate the Adobe Connect V2 app as described in the Managing Apps & Features article of the Knowledge Base. The app is listed in the Web Conferencing tab.
Once you have activated the app, go back to your Adobe Connect account, and enable pop-ups for your Adobe Connect platform. This step is needed for the proper configuration of VILT (Virtual Instructor-Led) courses.
Creating an Adobe Connect V2 Account in Docebo
To set up the integration in your platform, access the Admin Menu by pressing the gears button in the top right corner of the screen. Then, find the Adobe Connect V2 section and select the Manage subitem. The Adobe Connect V2 page shows all the accounts already configured with Adobe Connect. In order to configure a new account, press the New Account button in the top right corner.
In the right panel type your account name, domain name, Adobe Connect username and password. Please note that you can map the Adobe Connect username with any standard or additional Docebo user field.
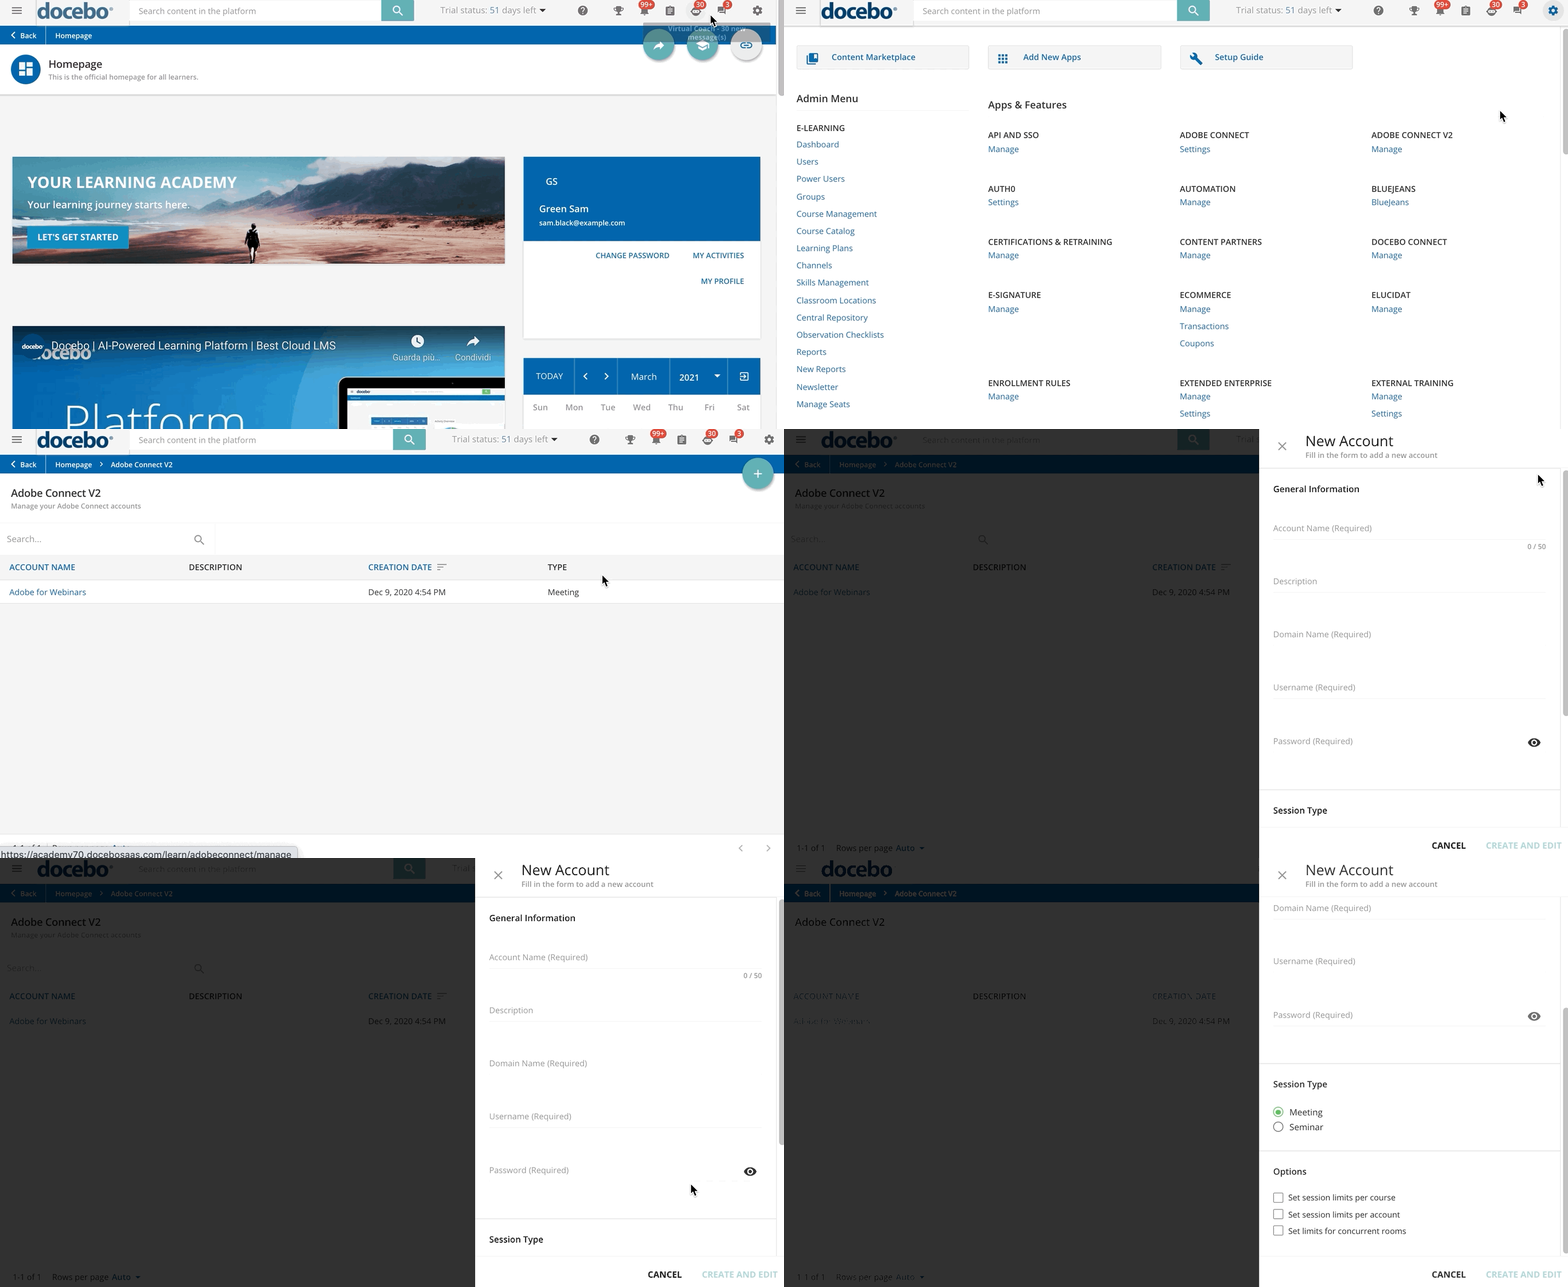
Select the session type; either Meeting or Seminar depending on your Adobe Connect subscription. Carefully consider your choice since you will not be able to change it once you proceed with the next step of the account creation.
Add the maximum number of sessions per course, total sessions and concurrent rooms into the corresponding text boxes. Please note that the number of concurrent rooms should equal the number agreed upon in your Adobe Connect license.
Press Create & Edit to create the account and to proceed with its configuration.
When configuring webinar sessions using Adobe Connect V2 you have the possibility to configure a minimum percentage of time that learners have to spend in the event using the Adobe Connect V2 webinar tool in order to mark the event as completed. Find out more in the Knowledge Base article on ILT and VILT courses.
Notes about creating an Adobe Connect V2 Account in Docebo
- Remember that Docebo synchronizes webinars’ data in Adobe and not vice versa. In order not to alter the automatic completion flow, you should never edit sessions in Adobe, do so in Docebo instead.
- Meetings created in Adobe Connect with this integration are created as shared meetings.
Configuring an Adobe Connect V2 Meeting Account
You can access the configuration area of your Adobe Connect Meeting account right after the account creation (after clicking Create & Edit) or at any time from the Adobe Connect V2 main page, by clicking on the account name.
The configuration area of your Adobe Connect Meeting account is divided into three tabs: Properties, Templates, and Folders. From this area, you can manage the details of your Adobe Connect Meeting account, and optionally associate templates and folders to it. It is not mandatory to associate templates and folders to the account.
The Properties tab is divided into two vertical tabs, General and Details, where you can check and edit the details you inserted in the account creation right panel.
When enabling the Mark the event as attended if the user spends at least % of the total time of the webinar in the webinar tool option in the events’ configuration, you can set whether to enable the tracking of the learner attendance in the events hosted by the selected account by mapping the Adobe Connect usernames for the users registered in the event with a Docebo user field different from username. To do so, activate the Enable Attendance Tracking option and select a user field from the Docebo Field dropdown. When this option is disabled, the default mapped Docebo field is username.
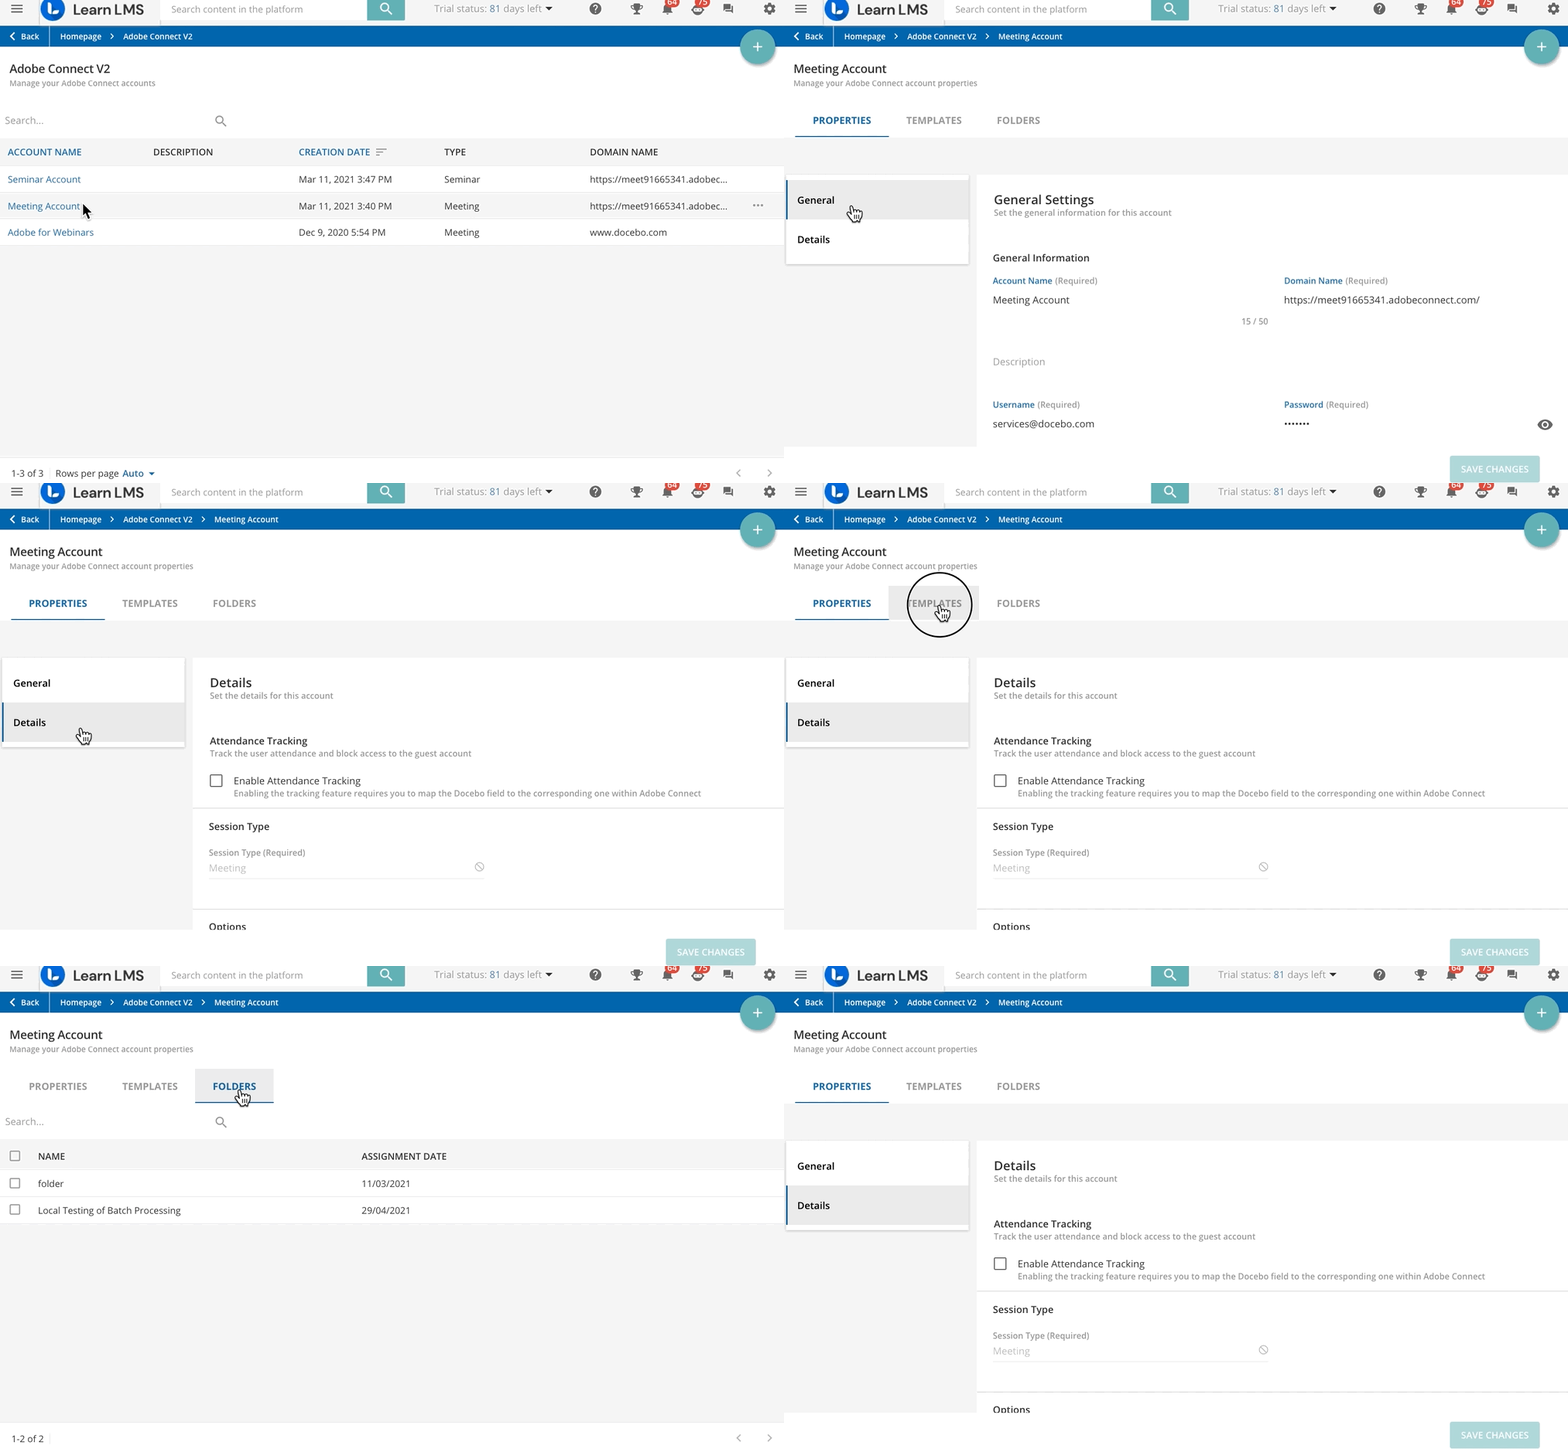
In the Template tab, assign the meeting room templates you have defined in Adobe Connect. Click on the plus button in the top right corner and select the Assign Template option. In the right panel, look for the templates synchronized from your Adobe Connect account from the search bar and select those you want to assign to the selected account. Please be aware that it may take up to one minute for the platform to retrieve your templates from Adobe. Press Confirm to proceed.
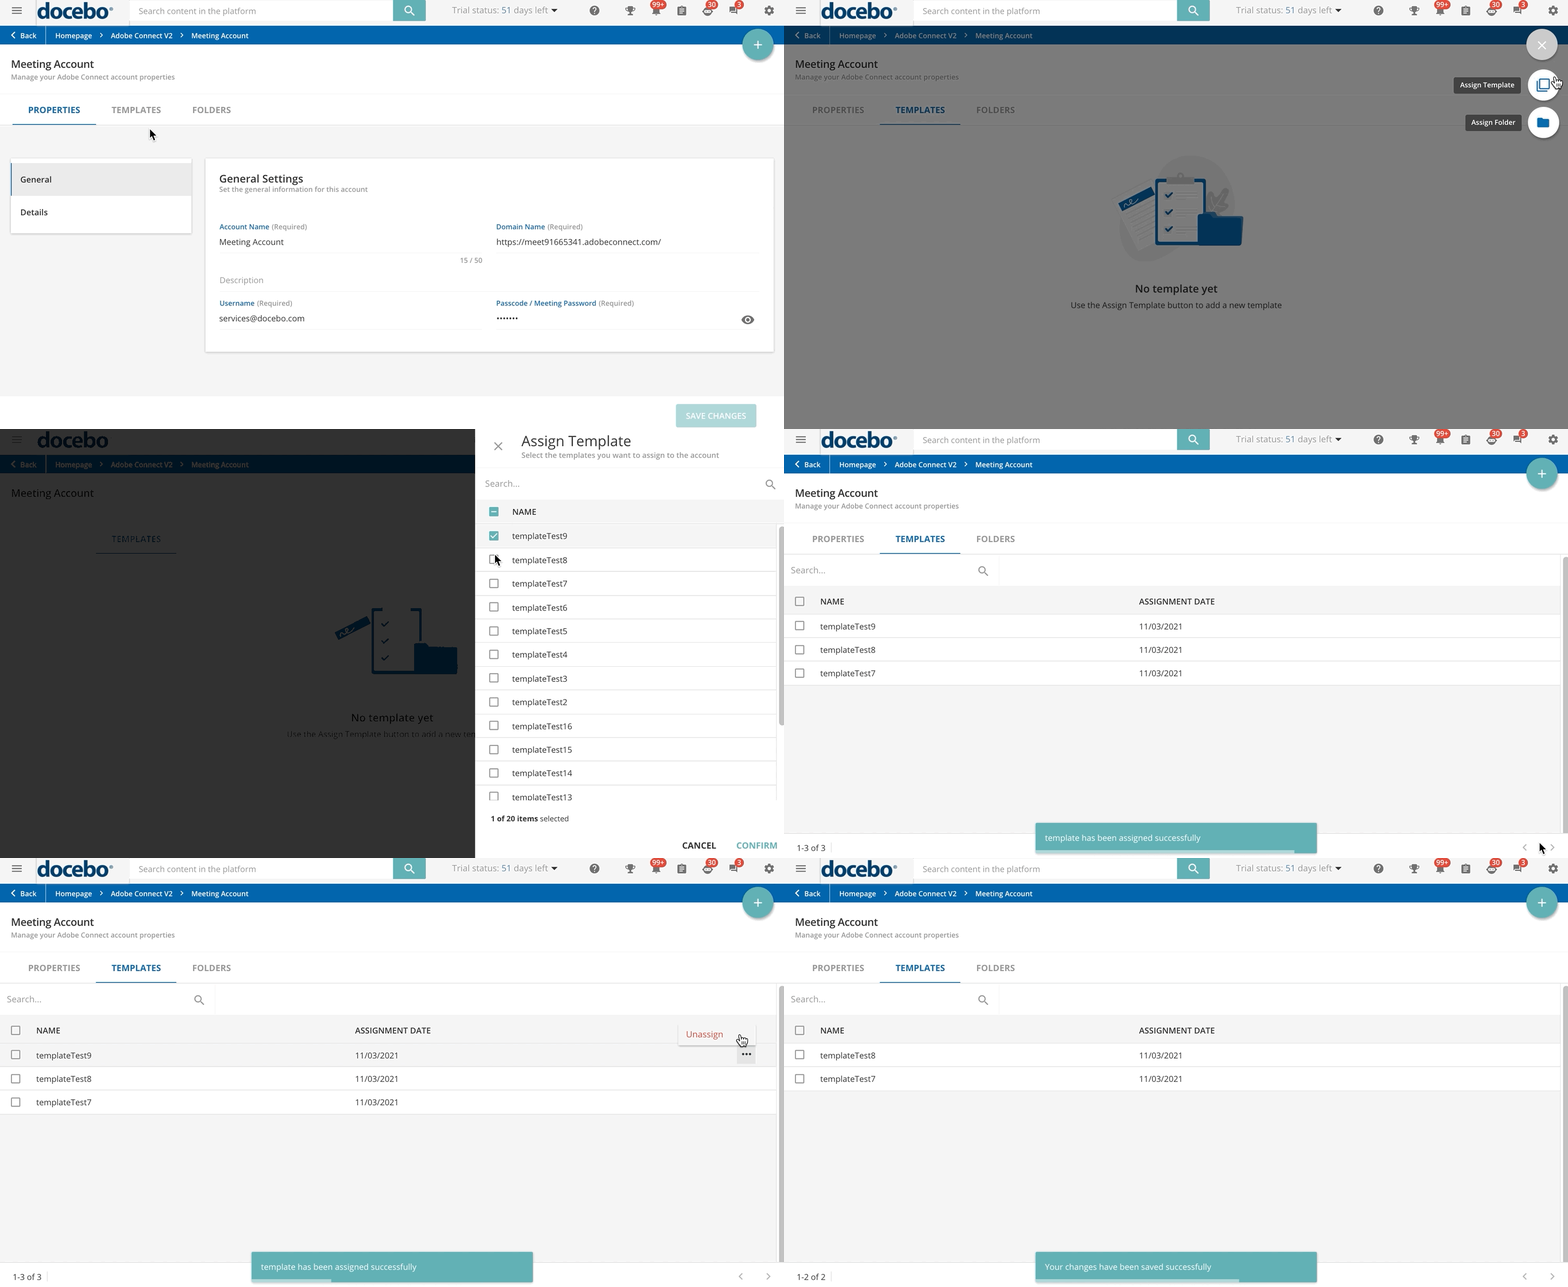
The selected templates are now listed in the Templates tab. At any time, you can remove any of the associations by clicking on the ellipsis menu at the end of the template row and selecting the Unassign option. If you need to unassign more than one template from the selected account, select them by clicking on the checkbox next to their name, click on Choose Action in the bottom right corner of the page, and select the Unassign All option.
Move to the Folders tab to assign the folders you have defined in Adobe Connect to the selected account. Click on the plus button in the top right corner and select the Assign Folder option. In the right panel, select the folders synchronized from your Adobe Connect account that you want to assign to the selected account. Please be aware that it may take up to one minute for the platform to retrieve your folders from Adobe. Press Confirm to proceed.
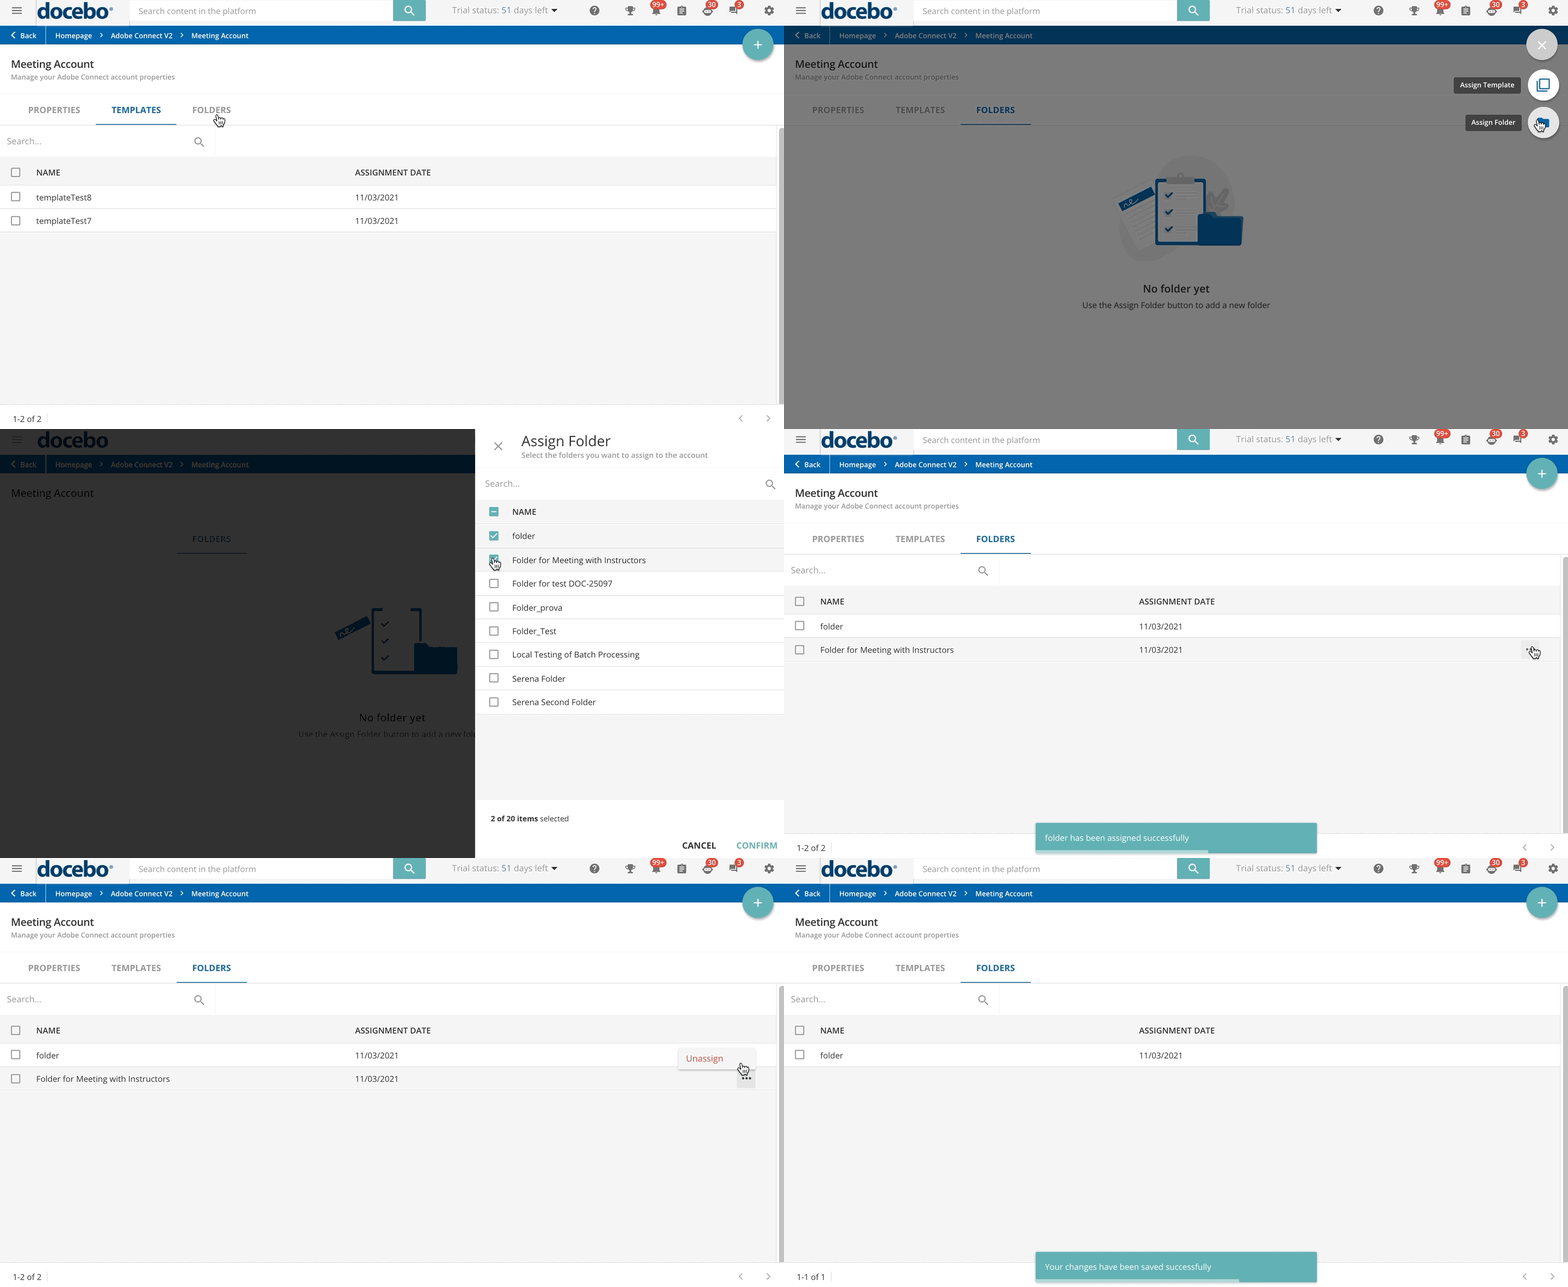
The selected folders are now listed in the Folders tab. At any time, you can remove any of the associations by clicking on the ellipsis menu at the end of the folder row and selecting the Unassign option. If you need to unassign more than one folder from the selected account, select them by clicking on the checkbox next to their name, click on Choose Action in the bottom right corner of the page, and select the Unassign All option.
Notes about configuring an Adobe Connect V2 Meeting Account
- You cannot change the account session type you have selected, switching it to Seminar.
- You can assign up to 20 templates to every account.
- Templates and folders are not kept synchronized between Adobe Connect and Docebo. As an example, if you delete a folder or a template from Adobe Connect after you assigned it to a Docebo Meeting Account, the assignment to the deleted folder or template will be kept, thus preventing the creation of meetings with the account.
- The Adobe account used to create a meeting will also be used as the "host" of the meeting.
Configuring an Adobe Connect V2 Seminar Account
You can access the configuration area of your Adobe Connect Seminar account right after the account creation (after clicking Create & Edit) or at any time from the Adobe Connect V2 main page, by clicking on the account name.
The configuration area of your Adobe Connect Seminar account is divided into three tabs: Properties, Templates, and Rooms. From this area, you can manage the details of your Adobe Connect Seminar account, and associate templates and rooms with it. Though the association of the account with a template is optional, it is mandatory to associate it with at least one room. Failing to associate an account with a room will prevent you from creating VILT webinar sessions using the account you are configuring.
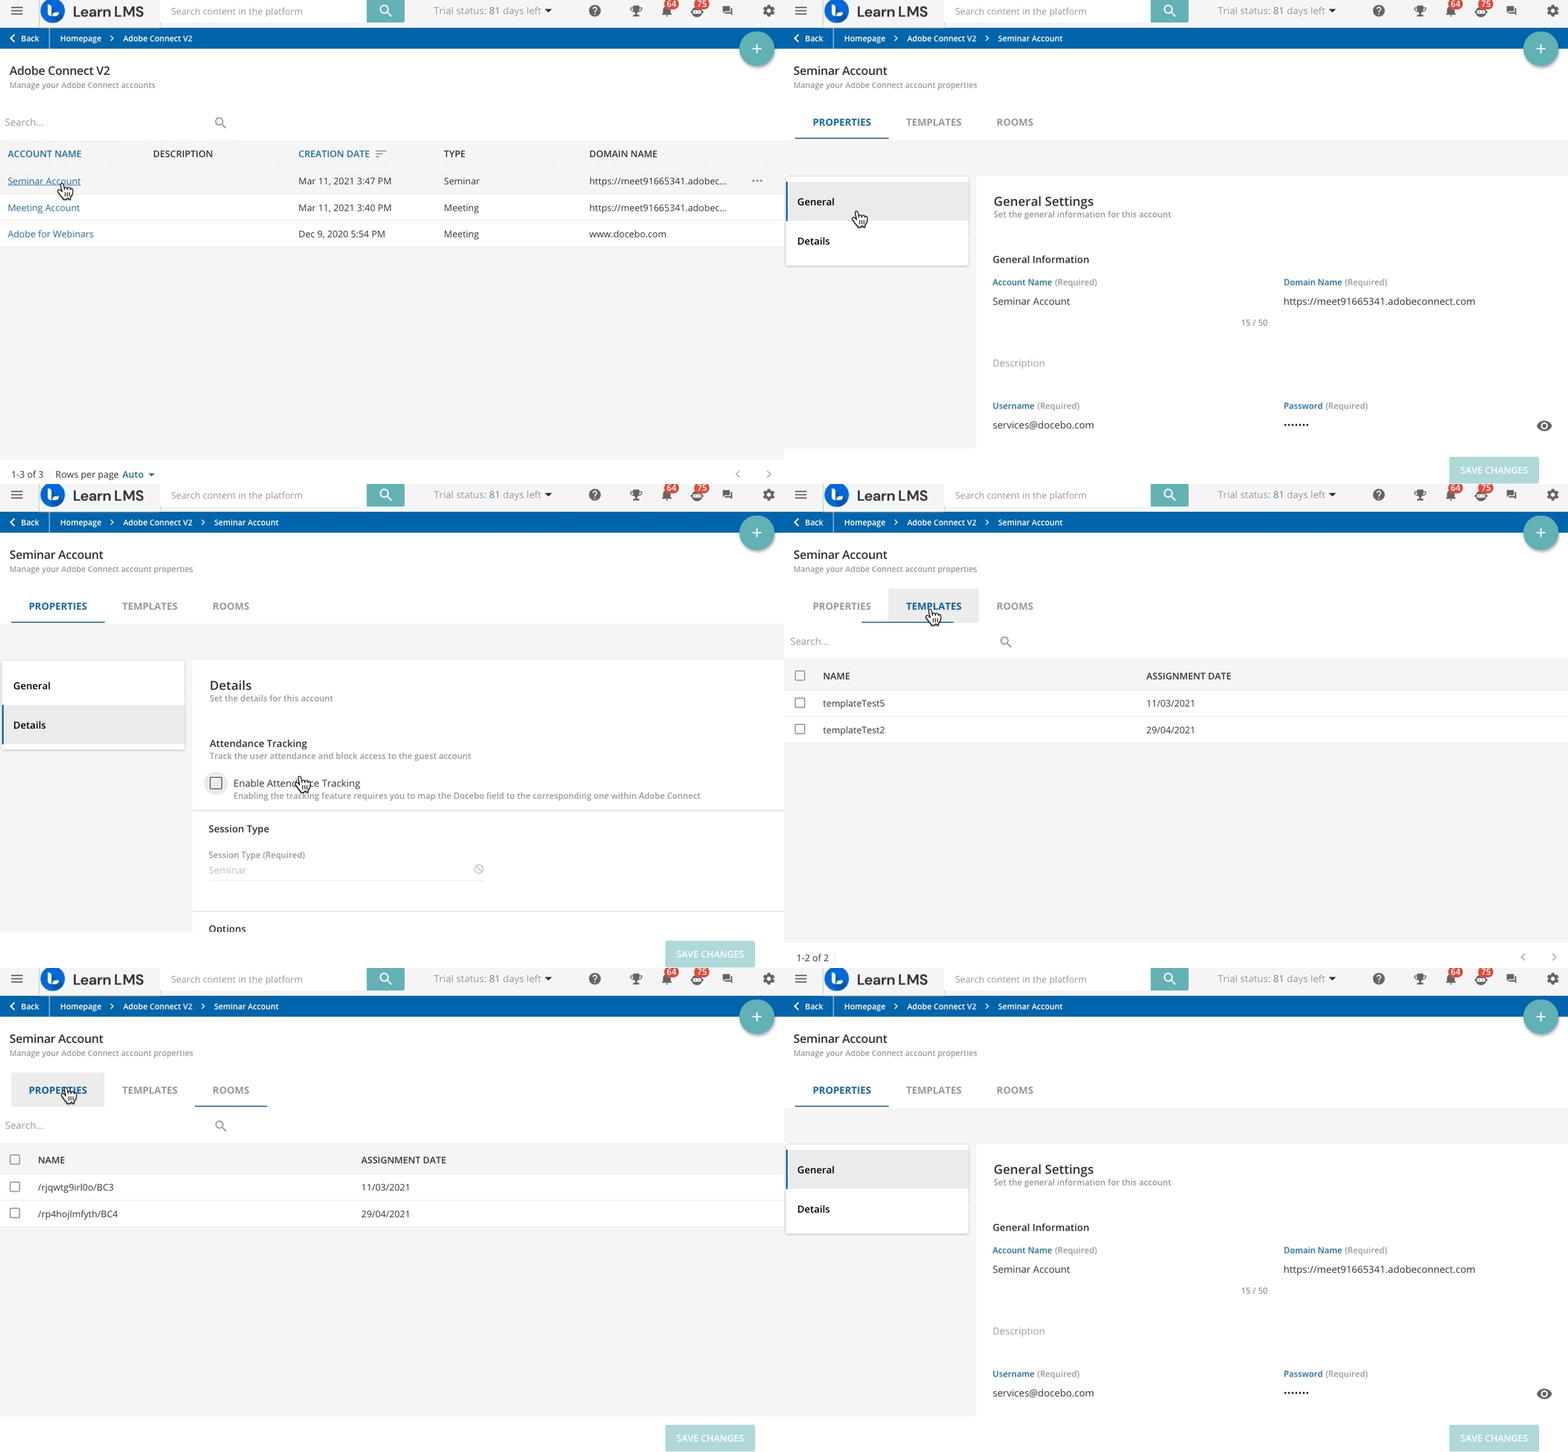
The Properties tab is divided into two vertical tabs, General and Details. From here, you can check and edit the details you inserted in the account creation right panel.
When enabling the Mark the event as attended if the user spends at least % of the total time of the webinar in the webinar tool option in the events’ configuration, you can set whether to enable the tracking of the learner attendance in the events hosted by the selected account by mapping the Adobe Connect usernames for the users registered in the event with a Docebo user field different from username. To do so, activate the Enable Attendance Tracking option and select a user field from the Docebo Field dropdown. When this option is disabled, the default mapped Docebo field is username.
In the Template tab, assign the meeting room templates you have defined in Adobe Connect. Click on the plus button in the top right corner and select the Assign Template option. In the right panel, look for the templates available in your Adobe Connect account from the search bar and select those that will be assigned to the selected account. Please be aware that it may take up to one minute for the platform to retrieve your templates from Adobe. Press Confirm to proceed.
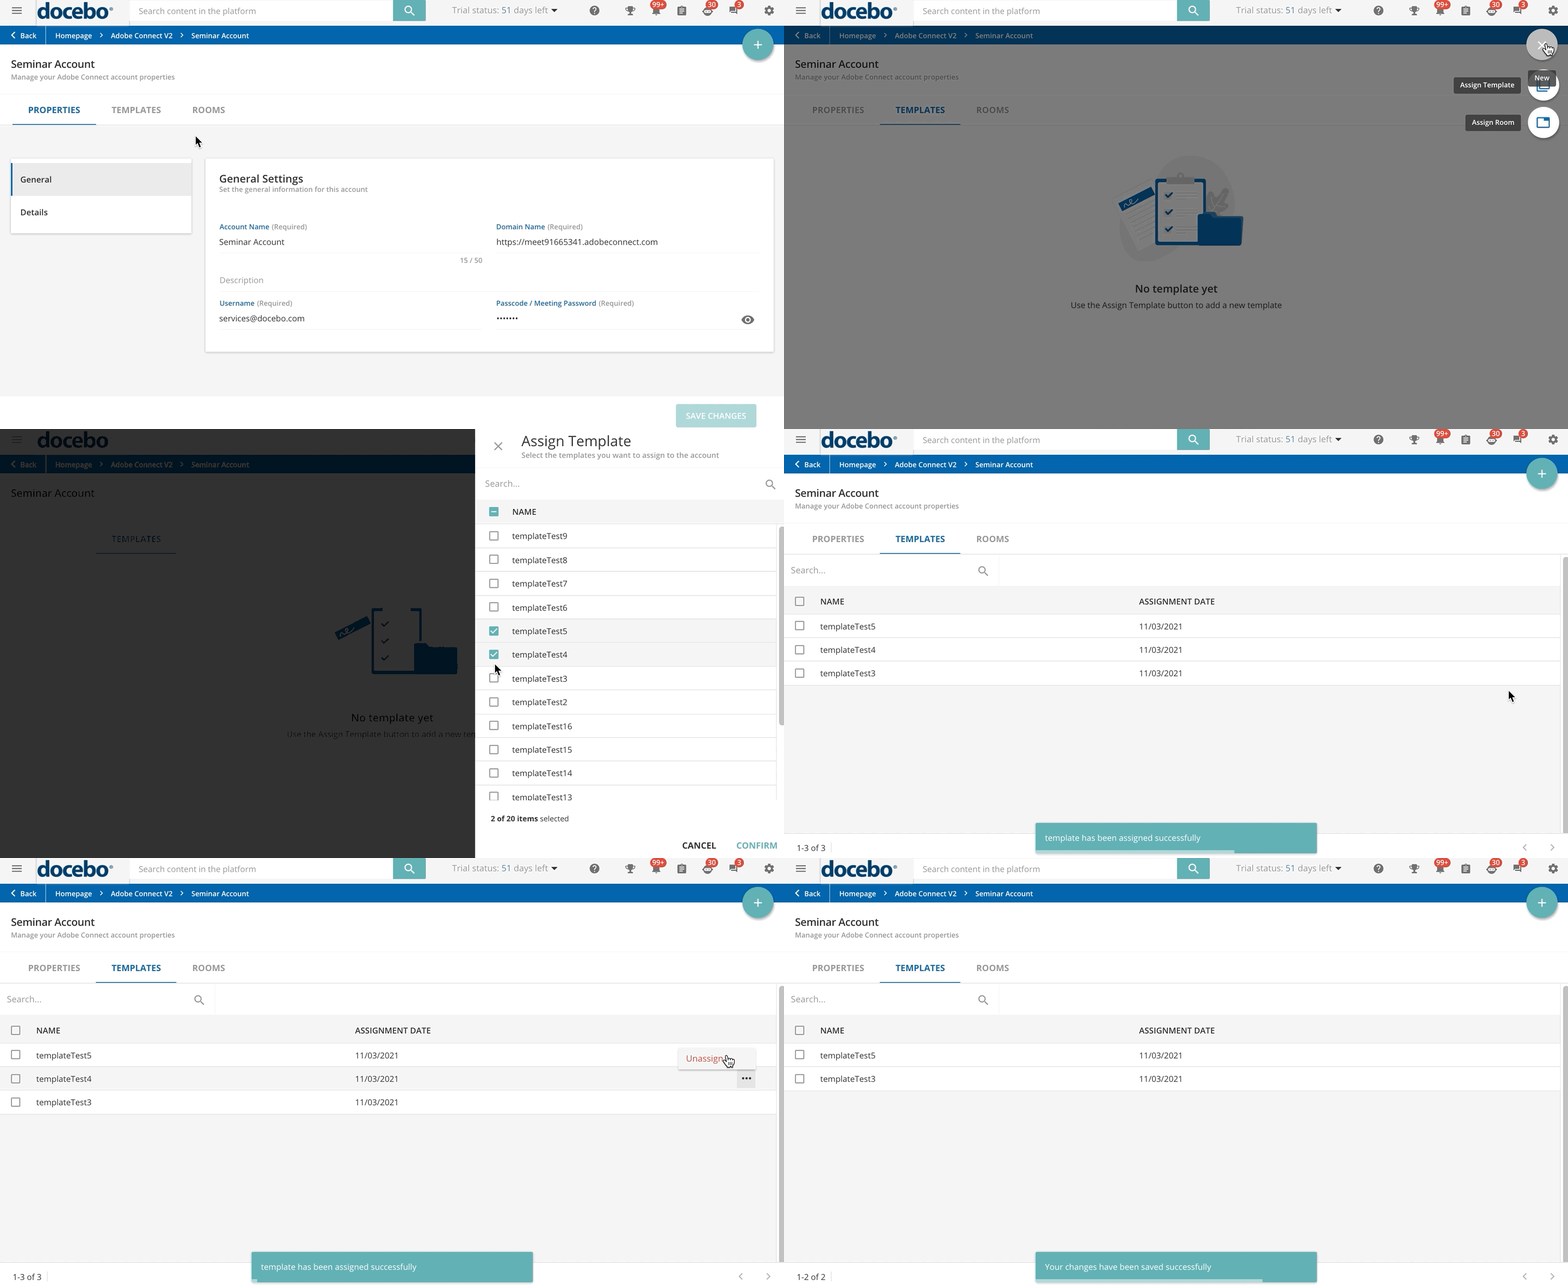
The selected templates are now listed in the Templates tab. At any time, you can remove any of the associations by clicking on the ellipsis menu at the end of the template row and selecting the Unassign option. If you need to unassign more than one template from the selected account, select them by clicking on the checkbox next to their name, click on Choose Action in the bottom right corner of the page, and select the Unassign All option.
Move to the Rooms tab to assign the rooms you have defined in Adobe Connect to the selected account. This step is mandatory for the creation of VILT webinar sessions. Click on the plus button in the top right corner and select the Assign Room option. In the right panel, select the rooms synchronized from your Adobe Connect account in order to assign them to the selected account. Please be aware that it may take up to one minute for the platform to retrieve your rooms from Adobe. Press Confirm to proceed.
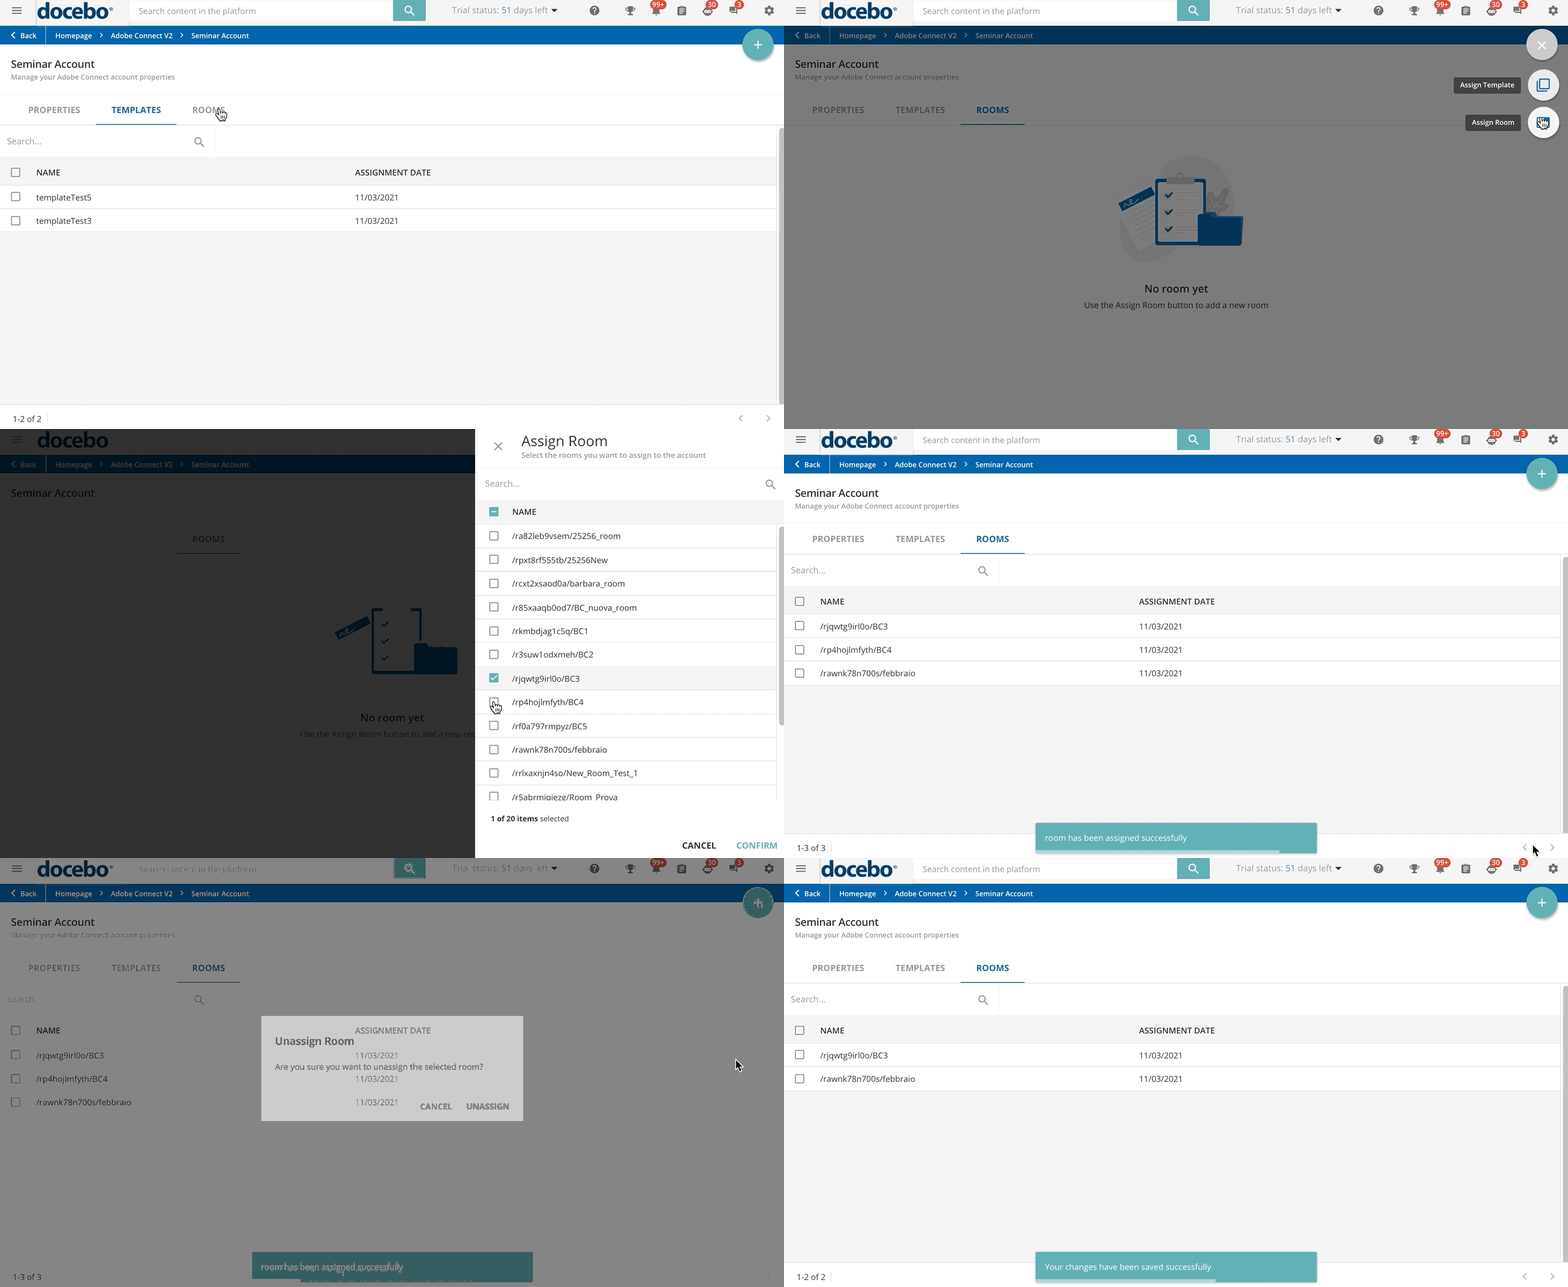
The selected rooms are now listed in the Rooms tab. At any time, you can remove any of the associations by clicking on the ellipsis menu at the end of the room row and selecting the Unassign option. If you need to unassign more than one room from the selected account, select them by clicking on the checkbox next to their name, click on Choose Action in the bottom right corner of the page, and select the Unassign All option.
Notes about configuring an Adobe Connect V2 Seminar Account
- You cannot change the account session type you have selected, switching it to Meeting.
- You can assign up to 20 templates to every account.
- Templates and rooms are not kept synchronized between Adobe Connect and Docebo. As an example, if you delete a room or a template from Adobe Connect after you assigned it to a Docebo Meeting Seminar, the assignment to the deleted room or template will be kept, thus preventing the creation of seminars with the account.
Managing Your Adobe Connect Accounts
At any time, you can edit the details of your Adobe Connect accounts by accessing the Adobe Connect V2 page and hovering your mouse over the menu icon at the end of the account row and finally selecting the Edit option. From the same menu, select Delete to cancel the account.
If you have created Adobe Connect V2 sessions for courses having the Webinar course type, when deleting an Adobe Connect V2 account, you will no longer be able to access, edit or remove any webinar session created with the deleted account. Remember to delete any sessions associated with the account before deleting it and recreate them with another account (if needed).
This limitation does not apply to the webinar (VILT) sessions created for courses having the ILT (Instructor-Led Training) course type. Learn more about the new management of classroom courses and webinars.