Introduction
The integration between Docebo and Salesforce includes the support of Docebo in Salesforce Lightning and Classic Communities, for authenticated users only. This article details the instructions on how to make Docebo available on Salesforce Communities.
Before we start, both if you are using the Salesforce Lightning or Classic experience, start by creating your own community following the steps listed in the Salesforce knowledge base (opens in a new tab).
Remember that the tab shared in communities is the Learner tab (Docebo LMS tab), it is not possible to embed the Admin tab (Docebo Admin tab). For more information on tabs, please see the article Using Docebo embedded into Salesforce.
Use case scenario
Communities are useful tools to connect to customers, partners, and employees. Embedding Docebo into a community offers a great opportunity for them to be trained without leaving Salesforce.
Lightning communities
Once you have created your community, and you are using the Salesforce Lightning experience, move to the community workspace (called Digital Experiences in Docebo), click Builder, a new tab will open for the customization of your community. Click on the pen icon to open the Theme section, click on the arrow close to the window title and select Edit CSS, copy the following CSS, and paste it into the dedicated area:
.hideEl {
   display: none;
}
Press Save to proceed. You now need to add a page for Docebo in your community. Next, move to the Home dropdown menu and select + New Page. Select Standard Page and the 1-full width column option. Type a name for your page and press Create to continue.
Next, click on the flash icon to add the Docebo Component to your community, scroll down to the Custom Components section and drag and drop the DoceboLmsLightningComponent into your page. After a few seconds, your platform will be loaded into the page.
Click Navigation Menu under the Template Header Top area, then click again Navigation Menu from the top right window that will open. Click Add Menu Item and type a name for your page, then select the Community Page Type and select the page you have just created in the Page dropdown menu.
Click Publish in the top right corner to publish your page and make it available in your community.
Please note: If, after completing all the configurations for Salesforce Lightning Communities, there should be an issue that prevents the Docebo Learn platform from loading inside theDoceboLmsLightningComponentwith a blank page showing, please make sure that the SFDC profiles that are accessing the Communities page all have the correct permissions to access necessary Apex Classes.
In the Salesforce Lightning experience, permissions are set by going into the Profiles menu (which you can search using the Quick Search feature on Setup), selecting the profile to edit and then clicking on the Apex Class Access link. There you can edit the class a profile has access to. All Docebo classes (the ones starting withdocebo_v3) must always be in the Enabled Apex Classes set in order for the integration to work correctly.
As the community site is accessible for Salesforce authenticated users only, every user authorized in viewing the site must belong to one of these profiles, having correct access permissions to the Apex Classes.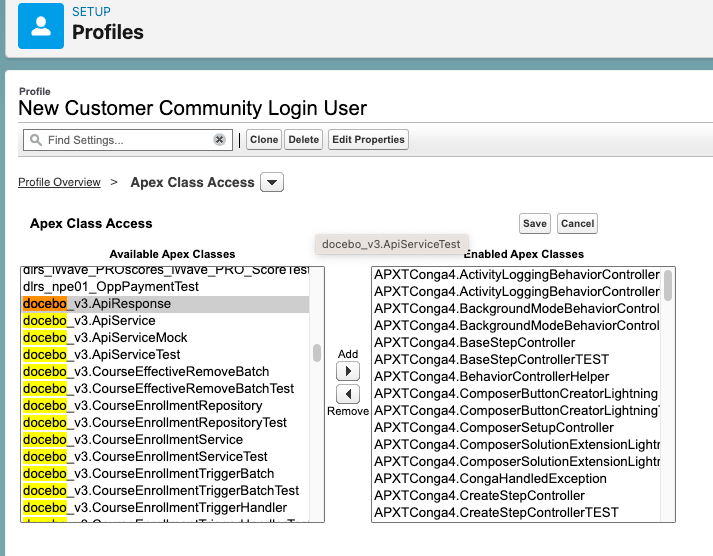
Enhanced security for Salesforce Lightning communities
If you want to secure access to your Salesforce Lightning Community to a limited number of trusted sites, while in the Builder area, move to the Settings menu option, then open the Security tab. In the Security Level box, select the option Relaxed CSP: Permit Access to Inline Scripts and Allow Hosts and make sure that the Lightning Locker toggle is On.
Next, move to the Trusted Sites for Scripts section, click on Add Trusted Sites and enter your platform SaaS domain:
https://yourplatformname.docebosaas.com
and the Docebo Proxy URL:
https://anubi.docebo.cloud
Once the community security is configured as described in the steps above, a warning message is displayed in the Custom Components area of the Components menu, informing you that some components in the section are blocked due to the community's security level setting. This is correct, do not worry.
Classic communities
Once you have created your community, and you are using the Salesforce Classic experience, move to the Setup menu, then select Build → Customize → Digital Experiences → All Sites. From this page, click New and select the Salesforce Tabs + Visualforce experience. Click Get Started in the experience dedicated page, enter a name for your community and, optionally, customize its URL. Click Create.
The community is being created. Once the community is ready, you will be redirected to the area dedicated to the newly created community. Click on Administration and move to the Tabs tab, selecting it from the left menu. Add the Docebo LMS tab in the Selected Tabs box and make sure it is the only tab in the box.
Next, move to the Settings tab and activate the community by clicking on Activate Community. The community is now published. This operation may take some minutes.
Classic communities can take advantage of the maximized view, meaning that the tab header is not displayed and users can enjoy a full-screen experience. Check out this article to learn more about it.